


*Updated September 8th, 2025
Installing new siding is a significant investment, but when done correctly, it can completely transform your home. Siding installation not only elevates your exterior curb appeal and gives it a refreshed, updated look but also serves as a crucial layer of protection against the elements. Choosing the right material—whether vinyl siding, fiber cement (e.g., James Hardie), or wood siding—is a big decision that impacts both appearance and durability, so it’s important to weigh your options carefully and follow best practices for proper installation.
To help you make an informed choice, we’ve outlined the pros and cons of various materials and what you can expect during the installation process. Whether you’re upgrading to boost your home’s value, improve energy efficiency, or simply achieve a new aesthetic, this guide has you covered.
Let’s explore everything you need to know about siding installation—from estimate to final inspection—and how to make the best decision for your home.
How to Prepare Your House for Siding Installation
Installation is a big project that affects more than the side of your home. Most contractors help you prepare, but you can take these steps to keep the project from start to finish running smoothly.
1) Take Care of the Landscaping
Installers need access to all sides of your home. Trim trees and bushes, and cut the grass right before installation so crews can find dropped nail or screw fasteners. Move planters and décor off the wall surface to prevent damage.
2) Remove or Cover Non-Permanent Items
Move statues, grills, and patio furniture; if heavy, pull them away from the side and cover. This keeps pathways smooth and clear for ladders, scaffolding, and materials.
3) Clear the Driveway
Crews often deliver a dumpster to haul existing siding and debris. Keep vehicles out and consider parking on the street.
4) Protect the Interior
Vibrations from installation can shake walls. Remove pictures and fragile décor so they don’t fall while contractors attach new siding panels and trim pieces.
5) Check for Exterior Obstructions
Move hoses, toys, and ladders to provide clear access to all sides. This helps prevent trips and speeds up installation.
Actual costs depend on your location, project scope, and materials. The best way to know what you'll pay is to get quotes from local contractors.
Get Your Free Estimate →6) Prepare for Dust & Debris
Close windows/doors and cover nearby items. Cutting vinyl and fiber cement generates dust—especially when using a circular saw with a specialized saw blade (or snap-and-snip methods for vinyl).
7) Inspect & Repair Underlying Issues
Before installation, address rot, mold, or leaks in plywood or sheathe. Fixing issues now ensures panels are installed properly and improves better long-term performance.
Siding Installation Steps
Updating your side cladding can give your home an entirely new look. Here’s what to expect.
1) Old Siding Removal
To install new cladding, crews remove existing siding (you might re-side only damaged areas). Debris goes to the dumpster. For wood siding, save reusable boards for decorative projects.
"We matched with a great contractor the same day. The whole process was easy and completely free."
2) Inspection of Walls
After removal, contractors check for water damage, mold, and damaged sheathe. They verify stud locations and structurally sound framing. Fixes here may affect your estimate, but they protect ROI.
3) Add Housewrap & Insulation
A weather-resistant barrier (housewrap) and optional foam insulation help allow water vapor to escape while blocking bulk water intrusion. Proper drainage details and flash elements around windows and doors are critical.
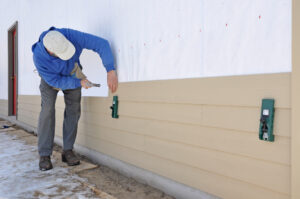
4) Install New Siding
This is the exciting (and noisiest) phase.
-
Vinyl siding installation / Install vinyl siding:
-
Start with corner post and starter strip, ensure plumb and level.
-
Hang panels horizontally (or vertical systems with furring strips), leaving spacing for expansion and contraction.
-
Don’t drive fasteners tight—leave the nail head proud about 1/32″ so panels can expand and contract with temperature changes.
-
Use j-channel around windows and doors and at soffit and fascia intersections. Overlap seams per manufacturer’s instructions; too much overlap can cause a visible buckle.
-
Cut vinyl with a fine-tooth blade (or score and snip).
-
-
Fiber cement / James Hardie:
-
Follow James Hardie specs for proper installation and compliance with building codes.
-
Use corrosion-resistant fastener systems (e.g., stainless steel or galvanize roofing nails) and maintain clearance from grade and roofing.
-
Miter trim corners cleanly; maintain flash and drainage planes to allow water to shed.
-
-
-
Prime cuts, keep required clearance, and consider furring strips for flatness on uneven wall surface.
-
Finish with trim details, caulk selectively where the brand allows (never trap water), and check that each side is true and smooth.
5) The Final Cleanup
Quality installers sweep/blow debris, magnet for metal, and tidy landscaping. A good crew leaves each side looking spotless after installation.
How Long Does Installation Take?
Timeline depends on home size, crew size, and repairs/painting. Most projects run 7–14 days. New construction can vary with framing schedules; complex installation projects may take longer.
Factors That Can Hurt Your Siding Installation
1) Improper Nailing
Over-tightened fasteners prevent movement, leading to cracks or buckle; too loose and panels sag. Correct nail placement in the slot center helps panels hang and move. This protects your warranty.
Why Hire a Licensed Professional
- Licensed & insured — protects you from liability
- Warranty coverage — manufacturers require pro installation
- Code compliance — avoids permit issues
- Faster completion — pros finish in days, not weeks
2) Excessive Overlap
Most vinyl siding calls for 1″–1¼” overlap; more can telegraph and stress joints.
3) Not Using Foam-Backed Vinyl Siding
Foam-backed siding panels can improve rigidity and energy performance; discuss options during your estimate.
4) Using Low-Quality Materials
Higher-quality products and stainless steel/galvanize fasteners offer better long-term results and elevate appearance.
DIY vs. Professional: At a Glance
5) Not Enough Clearance
Siding must maintain ground and roof clearance for drainage and to avoid wicking.
6) Inadequate Waterproofing
Skipping flash at penetrations, around windows and doors, or failing to shingle-lap housewrap compromises water management.
7) Poor Corners & Edges
Misaligned corners or corner post errors break sightlines and performance.
8) Incorrect Panel Alignment
Panels should be level and plumb. Misalignment creates gaps and stress points.
Spring and summer are the busiest seasons for home improvement projects — top-rated contractors book up fast. Lock in your estimate now before demand peaks.
Check Availability in Your Area →9) Ventilation & Barrier Strategy
Plan for ventilation behind cladding where system design requires it, and follow an engineer or manufacturer’s wall assembly guidance.
Choosing a Siding Installation Contractor
-
License & Insurance: Verify liability and workers’ comp.
-
Experience: Ask for recent jobs and references, including vinyl siding installation and fiber cement (e.g., James Hardie).
-
Brands & Methods: Ensure familiarity with your chosen system and manufacturer’s instructions.
-
Labor Warranty: Clarify coverage length and what’s included.
-
Local Presence: Prefer established local firms to avoid transient crews.
Final Thoughts
Siding installation is a transformative upgrade that boosts curb appeal, weather protection, and value. With thoughtful prep, adherence to best practices, and a qualified installer, your side cladding will be installed properly for lasting performance. Whether you install vinyl siding, choose fiber cement from James Hardie, or opt for premium wood siding, careful planning around fastener choice, flash, barrier, and panel spacing ensures compliance with building codes and great looks for years.
Ready to Move Forward?
Tell us about your project and get matched with up to 3 pre-screened contractors. Compare quotes, check reviews, and hire with confidence.
FAQ
Is Siding Installation Loud?
It can be, especially when cutting and fastening. Vinyl siding and aluminum often involve more cutting/drilling than fiber cement or wood siding. You’ll hear compressors, saws, and nailers. Discuss schedules and mitigation with your installer.
What Time of Year Is Best to Install Siding?
Fall is popular for mild weather, but quality installation happens year-round when crews plan for temperature changes and protect the assembly from moisture.
Does New Siding Increase Home Value?
Yes. Returns vary by market, siding material, and scope. Premium systems and proper installation tend to perform better long-term.
